Common issues
Troubleshoot resizing, colour differences, stringing, bed adhesion and changed printer settings.
Resizing a panel
Scale X and Y only. Never scale Z. The colour changes are set for the artwork’s original thickness.
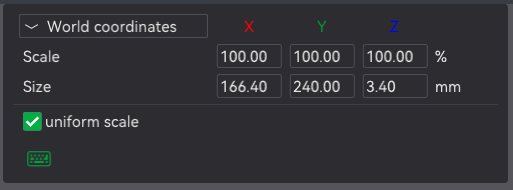
- In Prepare, select the artwork and open Scale. Note the original Z in the Size row. Untick Uniform scale.
- In the Scale row, enter the same percentage for X and Y. Leave Z at 100%. Setting X and Y to 75% gives a 124.80 × 180.00 mm print in this example.
- Check the Size row before slicing. Z should still read 3.40 mm for this panel. For another artwork, check against its own original thickness. Bambu Studio’s Scale tool · HueForge’s resizing FAQ
After shrinking a panel, check the smallest lettering or outlines in Preview. A stroke that was printable at full size may now be too narrow for the nozzle. If a detail disappears, try a larger X/Y size and slice again. Keep the layer heights specified for the artwork. Snapmaker on nozzle diameter and fine detail
The finish looks different from Preview
Preview shows the spool used for each layer. In the finished print, light passes through the upper layers and picks up colour from below. When choosing a substitute spool, look for a close match to the listed shade and transmission distance (TD). HueForge FAQ
Even two spools labelled “white” can give different results. At the same layer thickness, a higher-TD white shows more of the colour underneath. A lower-TD white covers it sooner. Compare the TDs if your highlights look washed out or shadows disappear. Snapmaker on transmission distance
Fine strings across the picture
Dry the spool that leaves the strands. Follow the filament maker’s time and temperature, and keep the spool dry during the print. If strings still appear, check retraction in that spool’s filament preset. Retraction draws filament back before the nozzle crosses an open area.
For Bambu PLA, the nozzle is set to 205 °C. Retraction is 0.3 mm at 50 mm/s. On another printer, compare your settings with the example and test one change at a time. Show retraction settings · Bambu Lab’s HueForge printing guide
The first layer lifts from the bed
In Prepare, select the same plate you fitted to the printer. Wash Bambu’s textured PEI plate with warm water and dish detergent. Rinse, dry and handle it by the edges. For other surfaces, follow the plate’s care instructions. Use the bed temperature and adhesive specified for your plate and filament. Bambu’s textured plate care
Watch the first layer, especially the corners. If a corner lifts or the lines fail to join, stop the print. Check the first-layer settings and bed levelling before restarting. These flat panels normally print without a brim. Bambu Lab’s plate guidance for HueForge
Bambu gives different settings for the same blue PLA kit on a P1S. On textured PEI it specifies 55 °C and recommends glue. On the original Cool Plate it specifies 35 °C and requires glue. Bambu Lab’s blue kit settings
Checking print settings
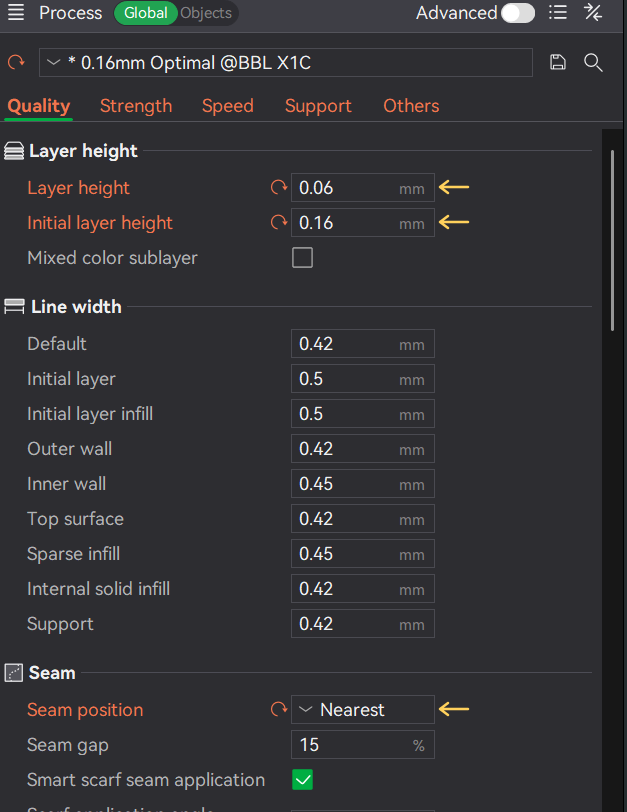
In Process → Global → Quality, check both layer heights against the artwork’s instructions. The pictured profile uses a 0.16 mm first layer and 0.06 mm layers after that.
In Quality, choose Arachne and turn ironing off. Show wall generator and ironing settings
In Strength, use Aligned Rectilinear for the top, bottom and internal solid patterns. Set sparse infill to 100% Rectilinear. Clear Detect narrow internal solid infill. Set Ensure vertical shell thickness to Disabled. Show shell and infill settings
Leave supports, brim and prime tower off. Show brim, support and prime tower settings
My speeds changed after switching printers
For a Snapmaker U1, convert the original 3MF with U1Convert. Show the U1 conversion steps
For a Bambu printer, open the original 3MF with the printer it was saved for. In Process → Global → Speed, compare the first layer, walls, top surface and infill with your working copy. The example uses 150 mm/s for sparse, internal solid and gap infill. Restore any speeds that changed. Show print speeds · Show how to switch printers
A print cooling fan still comes on
In Project Filaments, open the spool’s … menu and choose Edit → Cooling. Set the part fan and auxiliary part fan to 0% for the first 1,000 layers. Clear Force cooling for overhangs and bridges. Check that you edited the entry for your nozzle (Standard or High Flow). Show cooling settings
These fans direct air onto the print. Bambu gives separate advice for ventilating a P1S or X1C enclosure with its PLA kit. When the bed is above 45 °C, it recommends opening the front door or removing the top cover. Bambu Lab’s enclosure guidance
My AMS spools are in a different order
Keep the supplied project filaments. Changing those presets can change temperature, cooling and retraction. In Print plate, choose the physical slot for each project colour. If white is in A3, choose A3 for white. Show standard AMS printing · Show the eight-colour example
Why use a height range modifier?
A height range modifier saves time on the solid, single-colour base. The printer uses fewer, thicker layers there. Above the base, it returns to fine layers for the picture. Keep any modifier that came with the 3MF. If you add one, follow the base limit in the artwork’s Print Settings.
- Set up the colour changes or manual pauses and slice once. Note their Z heights in Preview.
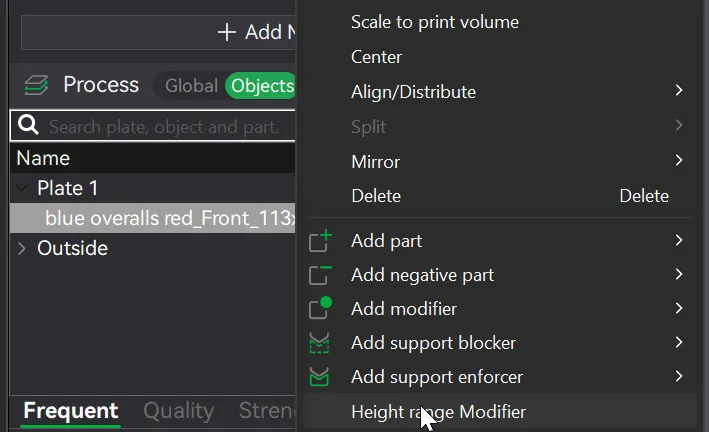
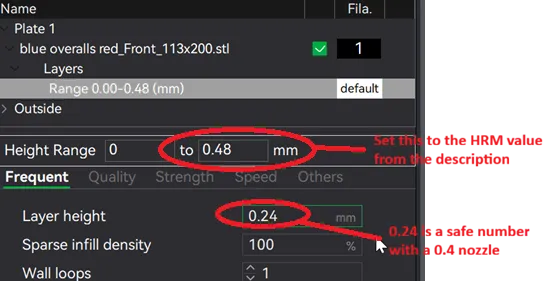
- Under Objects, right-click the artwork and choose Height range modifier. Set the range from the bottom of the model to its listed base limit. Choose the thicker layer height for that range. Keep the specified initial layer height.
- Re-slice and check the swap heights. Ghost Rider – Hellfire specifies the base below 0.48 mm. Yellow still starts at 0.92 mm even if the layer number changes. Ghost Rider listing
The listing screenshots illustrate a 0–0.48 mm range with a 0.24 mm layer height. Objects menu · Range and layer height fields
My colour-change layer numbers are different
With thicker base layers, the printer reaches each colour change in fewer layers. Check the Z height in millimetres at each change in Preview. It should match the height in the artwork’s instructions. HueForge’s explanation
Fitting a lightbox
Match the frame to your panel’s width and height. Fit the LED board behind the artwork. If you use a diffuser, it goes between the board and the print. Show the frame assembly and photos