Set up Bambu Studio for HueForge
The filament preset stores temperature, cooling and retraction. The process preset stores speeds, walls and infill. Save a copy of each for your printer. Each artwork has its own layer heights, colour changes, pauses and base modifier. Keep those with its 3MF.
To resize the artwork for your build plate, turn off Uniform scale. Scale X and Y only. Never scale Z. The original thickness keeps the artwork aligned with its colour changes. See the resizing example.
Other printers
Snapmaker U1
Use U1Convert to bring a MakerWorld or other supported 3MF project into Snapmaker Orca. It carries over compatible print settings, their saved values and layer-by-layer colour changes. It adapts the printer profile and machine G-code for the U1.
- Upload the original project 3MF, select the U1 profile and convert. The results show which settings changed and any spool swaps you’ll need.
- Download the converted 3MF and re-slice it in Snapmaker Orca. Check the colour-change heights in Preview against the artwork’s swap instructions.
Switching between Bambu printers
A profile downloaded for an A1 can lose its slower print speeds when you switch to a P1S. Record the settings before you switch.
- Open the 3MF as a project. Before changing the printer, take a screenshot of Process → Global → Speed. Note both layer heights and the wall generator under Quality. Keep the original file for comparison.
- Select your printer, nozzle diameter and flow type. Choose a compatible process preset. If you already have a HueForge preset for that printer, use it.
- Compare Speed, Quality and Strength with the original. Re-enter any values that reset when you switched printers.
- Use the disk icon to save the process preset under a name you’ll recognise, such as “P1S · 0.4 nozzle · HueForge”. Save the 3MF under a new name too.
If the supplied profile already matches your printer and nozzle, you can save its process preset directly.
Print speeds
Use the speeds supplied with your artwork. This profile uses slower speeds for the first layer and outer wall.
| Speed field | Setting |
|---|---|
| Initial layer / Initial layer infill | 37.5 / 55 mm/s |
| Outer wall / Inner wall | 75 / 150 mm/s |
| Sparse infill / Internal solid infill | 150 / 150 mm/s |
| Top surface | 100 mm/s |
| Gap infill | 150 mm/s |
| Slow down for overhangs | Off |
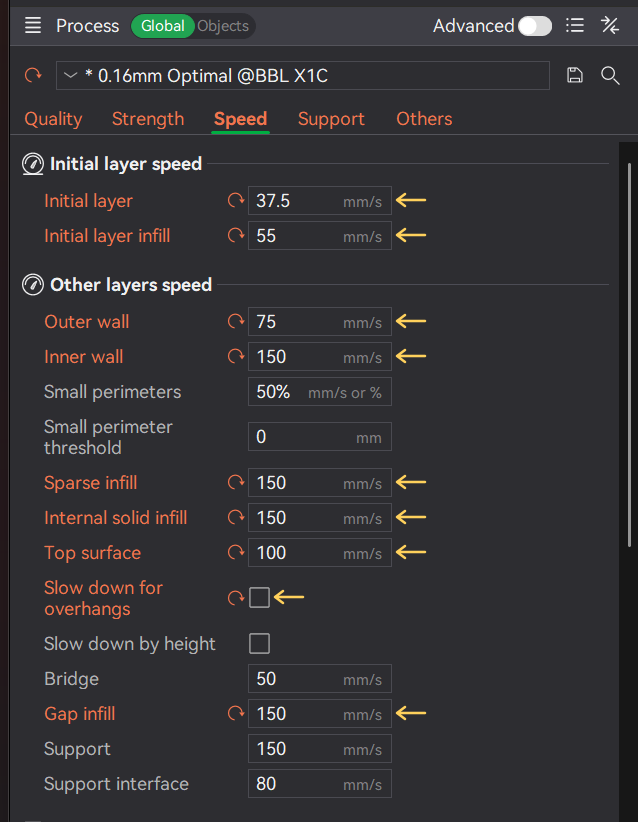
Small perimeters is 50%, with a 0 mm threshold. Slow down by height is off. Bridge speed is 50 mm/s. The two support speeds (150 mm/s for Support and 80 mm/s for Support interface) apply only when supports are enabled.
Filament preset
Bambu recommends drying the PLA in its HueForge kits. Use the spool maker’s time and temperature. Keep the spool dry while printing. Bambu Lab’s HueForge guide
Open the filament you want to edit
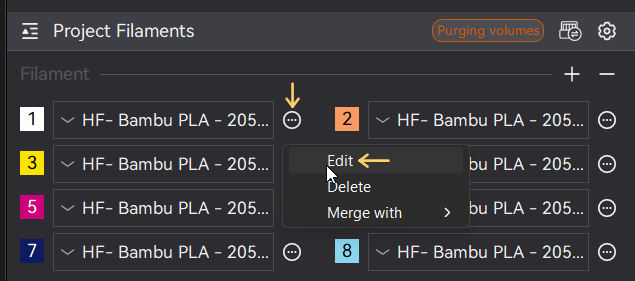
In Prepare, find the spool under Project Filaments. Open its … menu and choose Edit. You’ll assign the AMS slot later when you send the print.
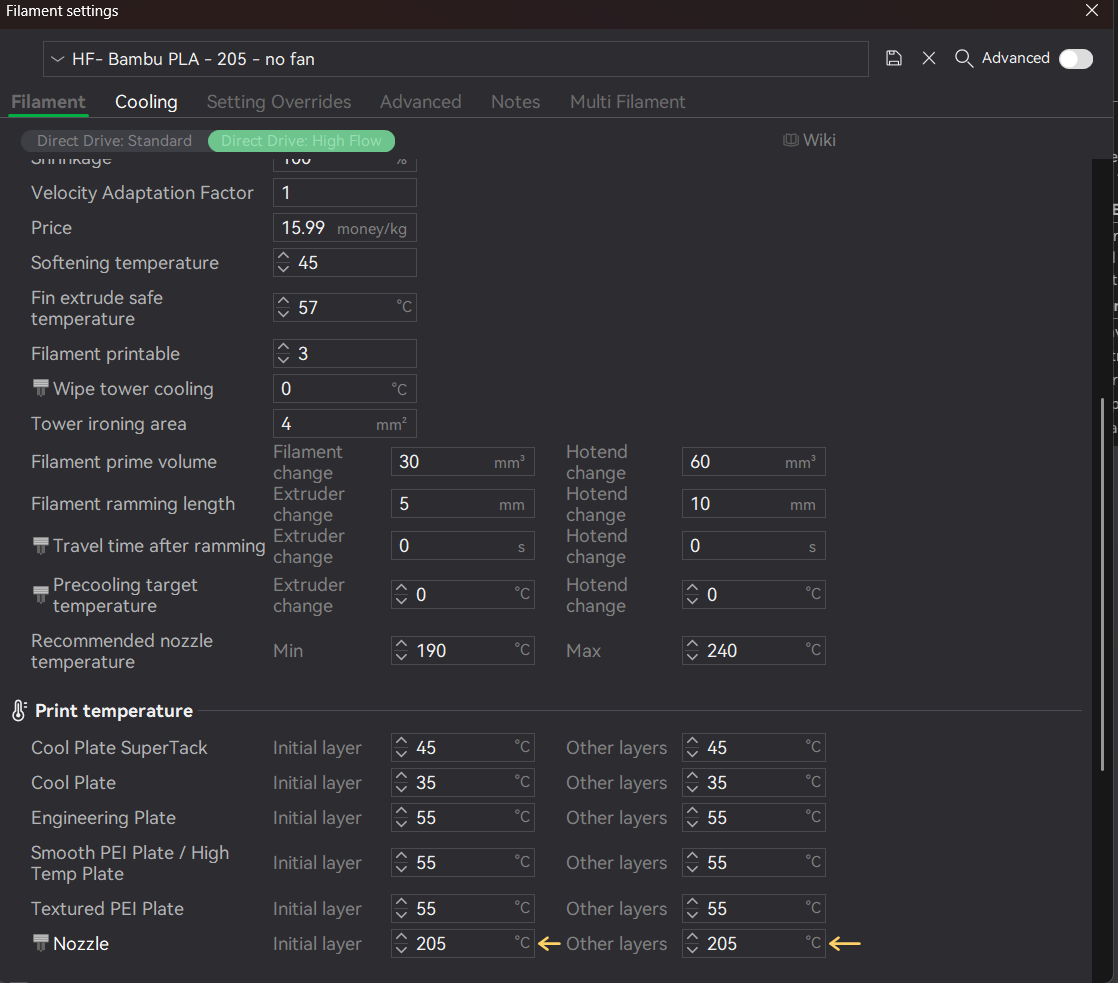
In Filament settings, choose the entry for your nozzle. Use Direct Drive: Standard for a standard nozzle and Direct Drive: High Flow for a high-flow nozzle. If you use both types, set up both entries.
Nozzle temperature
For Bambu PLA, open Filament → Print temperature. In the Nozzle row, set Initial layer and Other layers to 205 °C.
Cooling
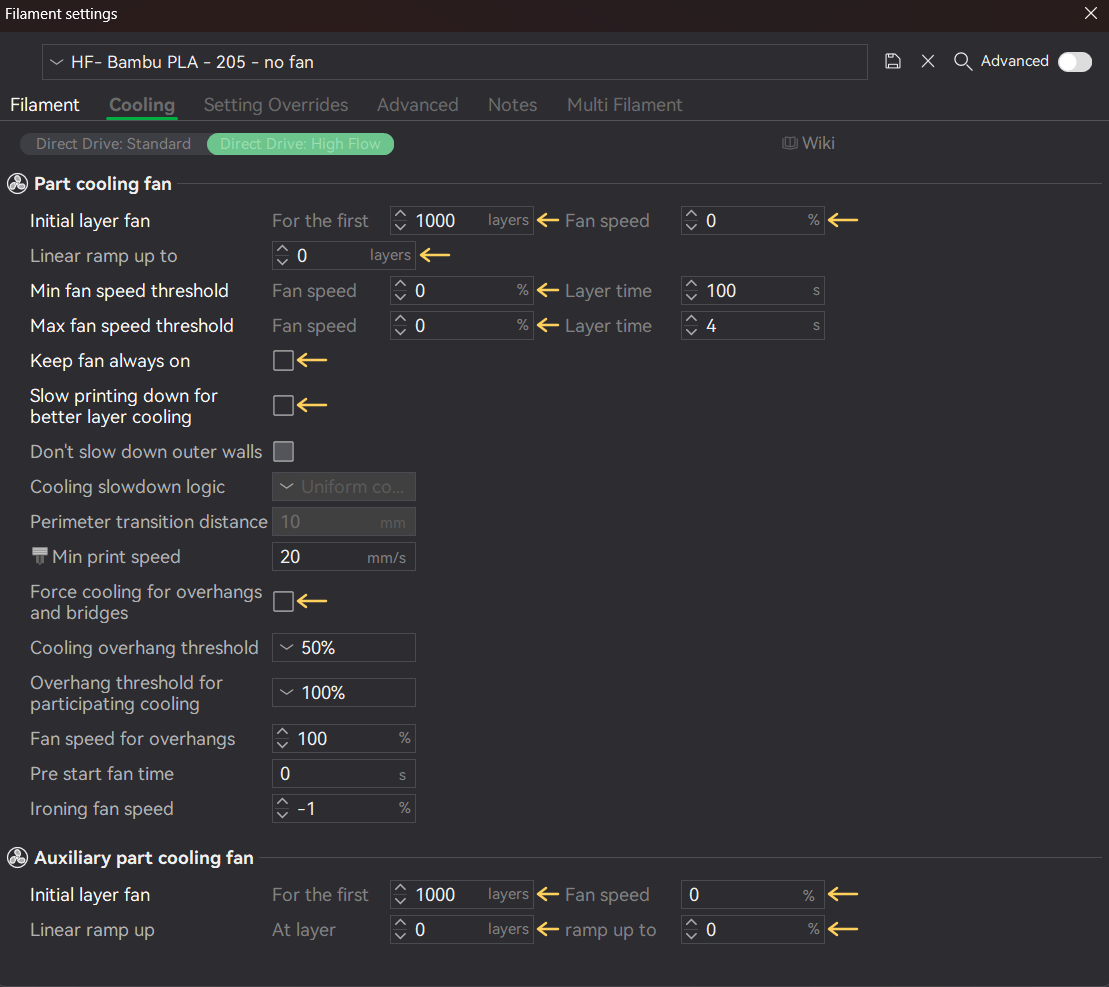
In Cooling, set the part fan and auxiliary part fan to 0% for the first 1,000 layers. Untick Force cooling for overhangs and bridges. These settings are for Bambu PLA. For another material, start with its recommended temperature and cooling.
| Cooling field | Setting |
|---|---|
| Part cooling fan → Initial layer fan | First 1,000 layers at 0% |
| Part cooling fan → Linear ramp up to | 0 layers |
| Min / Max fan speed threshold | Both fan speeds 0% |
| Keep fan always on | Off |
| Slow printing down for better layer cooling | Off |
| Force cooling for overhangs and bridges | Off |
| Auxiliary part cooling fan → Initial layer fan | First 1,000 layers at 0% |
| Auxiliary part cooling fan → Linear ramp up | At layer 0, ramp up to 0% |
Retraction
Retraction pulls filament back before the nozzle travels between details. If you see strings, try a dry spool first. In Setting Overrides → Retraction, tick the box beside each value you want to change. Prusa’s stringing and retraction guide
| Retraction field | Pictured setting |
|---|---|
| Length | 0.3 mm |
| Z hop when retract | 0.4 mm |
| Retraction speed / Deretraction speed | Both 50 mm/s |
For printers that support hotend changes, this preset uses 14 mm for “length when change hotend”. For filament cuts it uses Long retraction when cut (experimental), with Retraction distance when cut set to 18 mm.
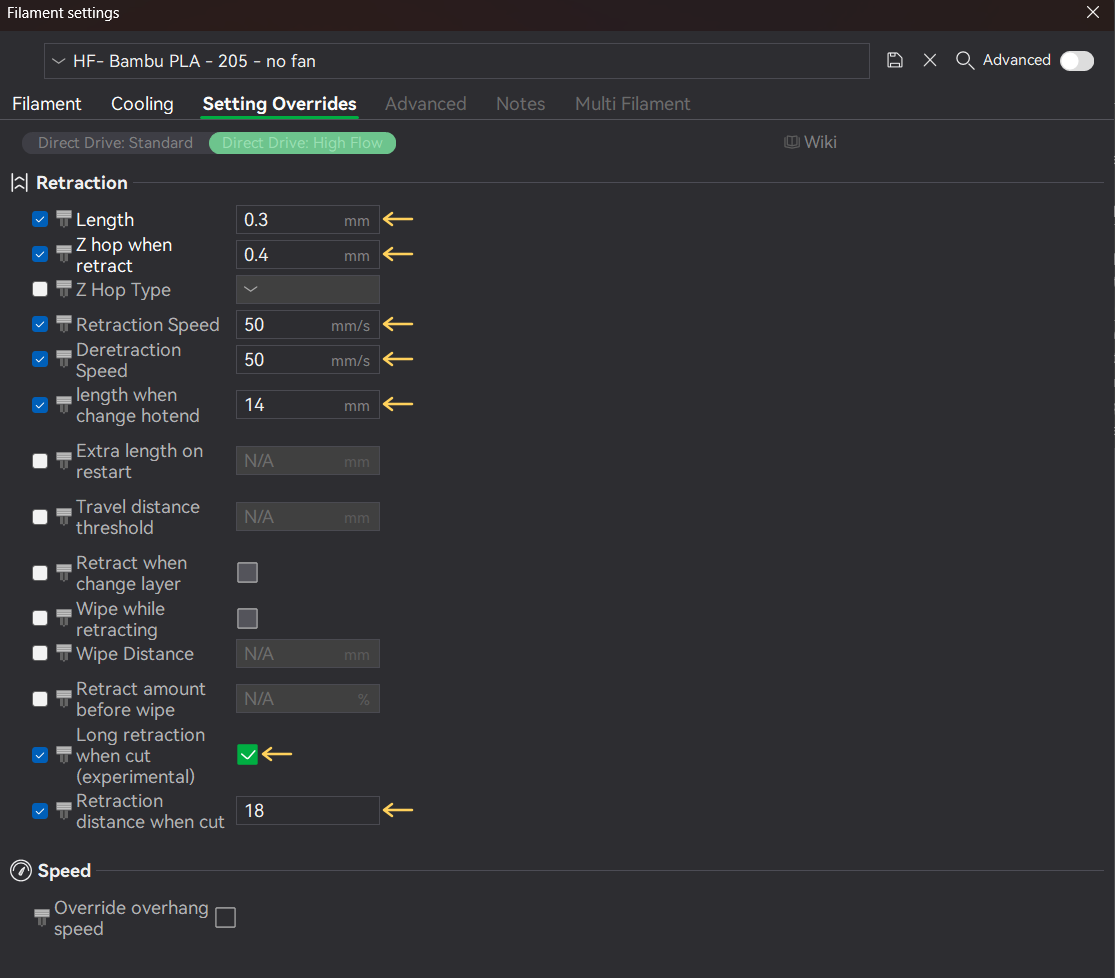
Save the filament preset
Click the disk icon beside the preset name. Give your copy a name such as “HueForge · Bambu PLA · 205 °C”. Apply it to each project filament that needs those settings. Keep the project colours and their order. If you use another printer or brand of PLA, test the temperature, cooling and retraction on your setup.
Check the process preset on the next print
Layer heights
In Process → Global → Quality, check Layer height and Initial layer height. Use the values in the artwork’s 3MF or listing.
| Field | Values you may see | This artwork |
|---|---|---|
| Layer height | 0.04, 0.06, 0.08, 0.12 or 0.16 mm | 0.06 mm |
| Initial layer height | 0.16, 0.20 or 0.24 mm | 0.16 mm |
Further down the same tab, set Seam position to Nearest.
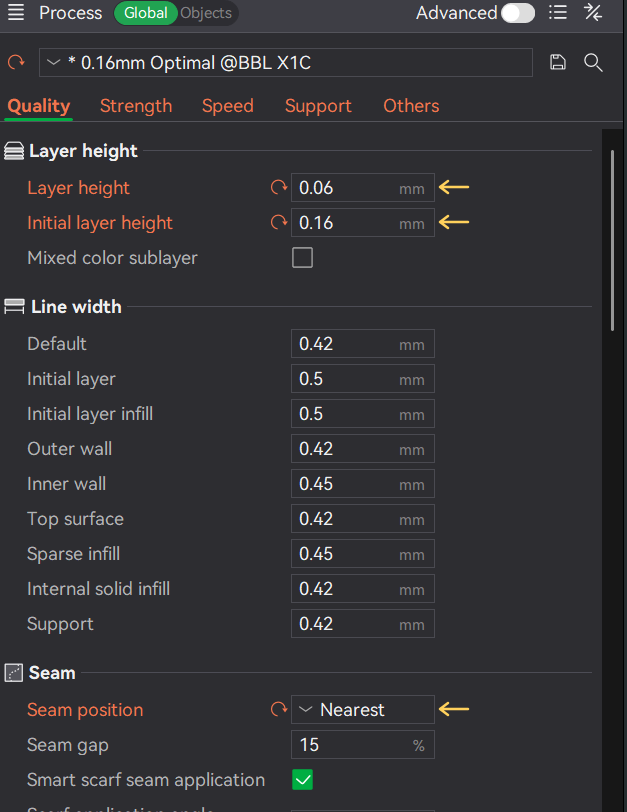
Wall generator and ironing
In Quality, select Arachne for Wall generator and No ironing for Ironing type.
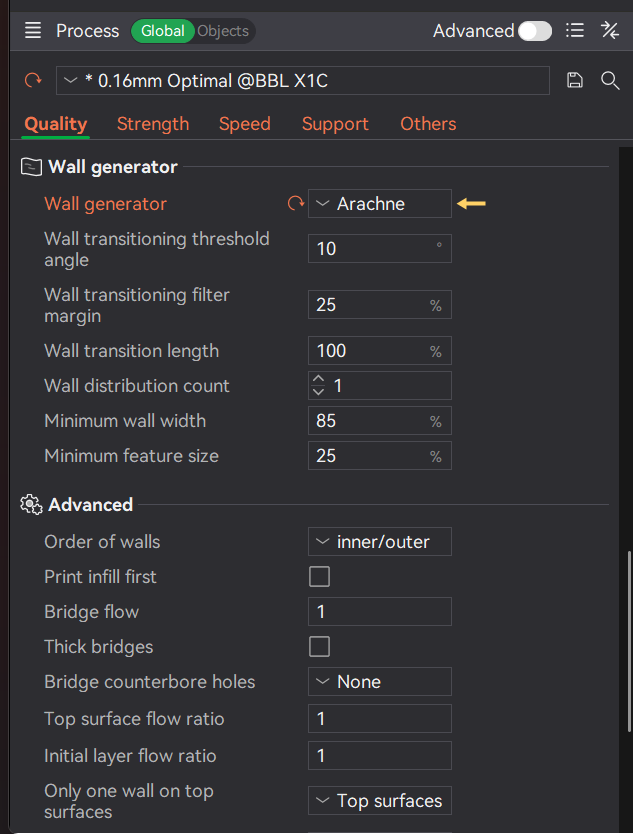
Surface finish and infill
In Strength → Walls, set Wall loops to 1. Under Top/bottom shells, the pattern dropdowns abbreviate Aligned Rectilinear to “Aligned R…”.
| Top/bottom shells | Top | Bottom |
|---|---|---|
| Surface pattern | Aligned Rectilinear | Aligned Rectilinear |
| Surface density | 100% | 100% |
| Shell layers | 1 | 999 |
| Shell thickness | 0 mm | 0 mm |
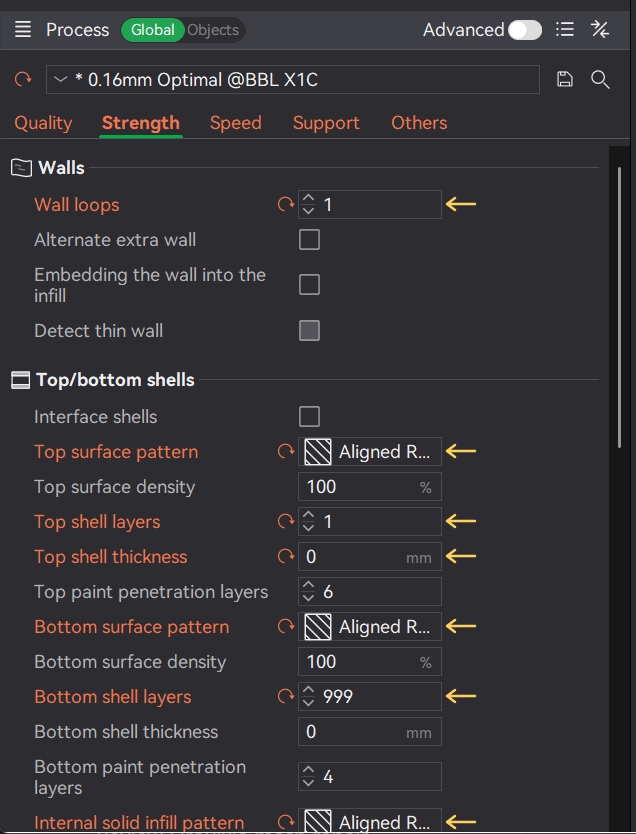
Scroll down to Internal solid infill pattern and select Aligned Rectilinear. Under Sparse infill, set the density to 100% and the pattern to Rectilinear.
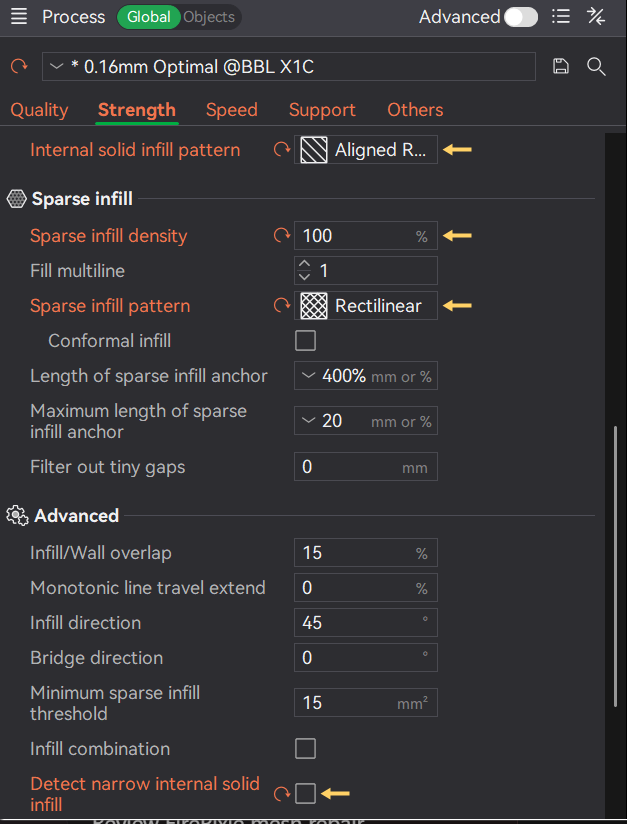
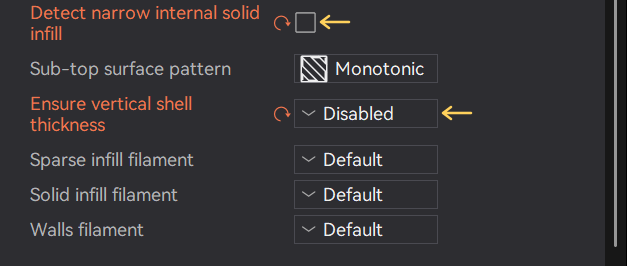
In Strength → Advanced, untick Detect narrow internal solid infill. Leave Sub-top surface pattern at Monotonic. Set Ensure vertical shell thickness to Disabled.
Brim, supports and prime tower
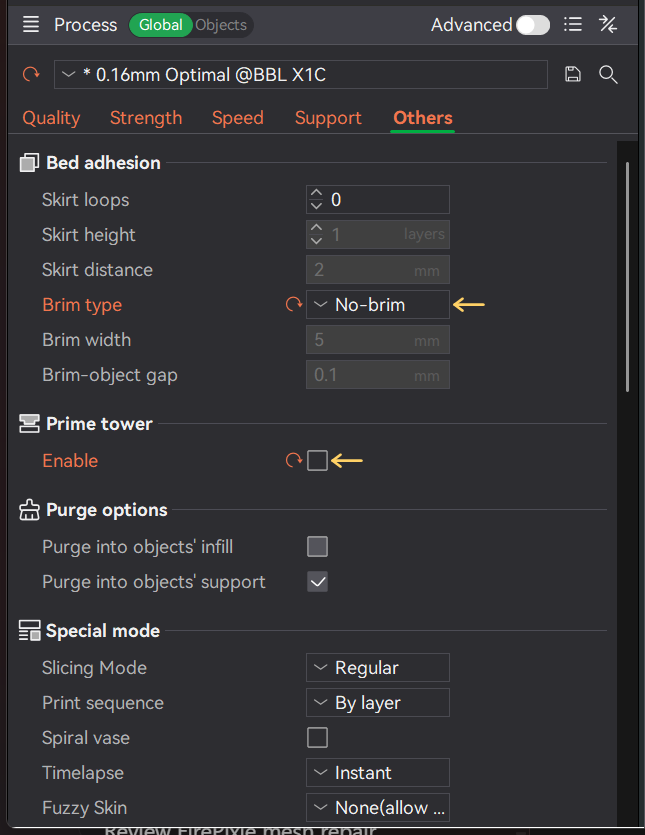
For these flat panels, clear Enable support in the Support tab. In Others, select No-brim for Brim type and clear Enable under Prime tower.
If a corner lifts, check which plate is selected in Bambu Studio and clean the one on the printer. Wash Bambu textured PEI with warm water and dish detergent. Rinse and dry it. Use the bed temperature and any adhesive specified for your plate and filament. Watch the first layer for loose lines or lifting edges. Bambu plate care · Snapmaker’s tips for large panels
Check the saved 3MF
Save and reopen your working 3MF. Check the printer, filament preset and print speeds. Keep any height range modifier supplied with the model. Click Slice plate. In Preview, check each colour change or pause against the height in millimetres in the listing.